Github
Setting up GitHub and RStudio
Now, we will connect O2 with GitHub. First, check in your Home directory if a .gitconfig file exists. You should only need to do this once. The contents should look like:
Where your_email@gmail.com is the e-mail associated with your GitHub account and your_GitHub_username is your GitHub username.
If you do not have a .gitconfig file in your Home directory, follow the instructions in the dropdown below to create a .gitconfig file.
Click here for instructions for making a .gitconfig file
In order to make a
.gitconfig, you will need to run the following command:usethis::use_git_config(user.name = "your_GitHub_username", user.email = "your_email@gmail.com")You will replace
your_GitHub_username with your GitHub username and your_email@gmail.com with the e-mail associated with your GitHub account.Reminder: If you already have your GitHub username and e-mail associated with your GitHub account in your `.gitconfig` file then you can skip this step.Click on circular arrow in the top right of the
Files tab called Refresh file listing. You can check that you have successfully made this .gitconfig file by looking for the hidden file in your home directory. The content should look like:
[credential]
    helper = store
[user]
    email = your_email@gmail.com
    name = your_GitHub_username
Note: In order to see hidden file in your file browser on the O2 Portal, you will need to click on the cog in the top right of theFilestab and selectShow Hidden Files.
Getting the Git tab
Now, we would like to get the Git tab into our Workspace Browser (where Environment, History, Connections and Tutorial tabs are located). We show this transition below:
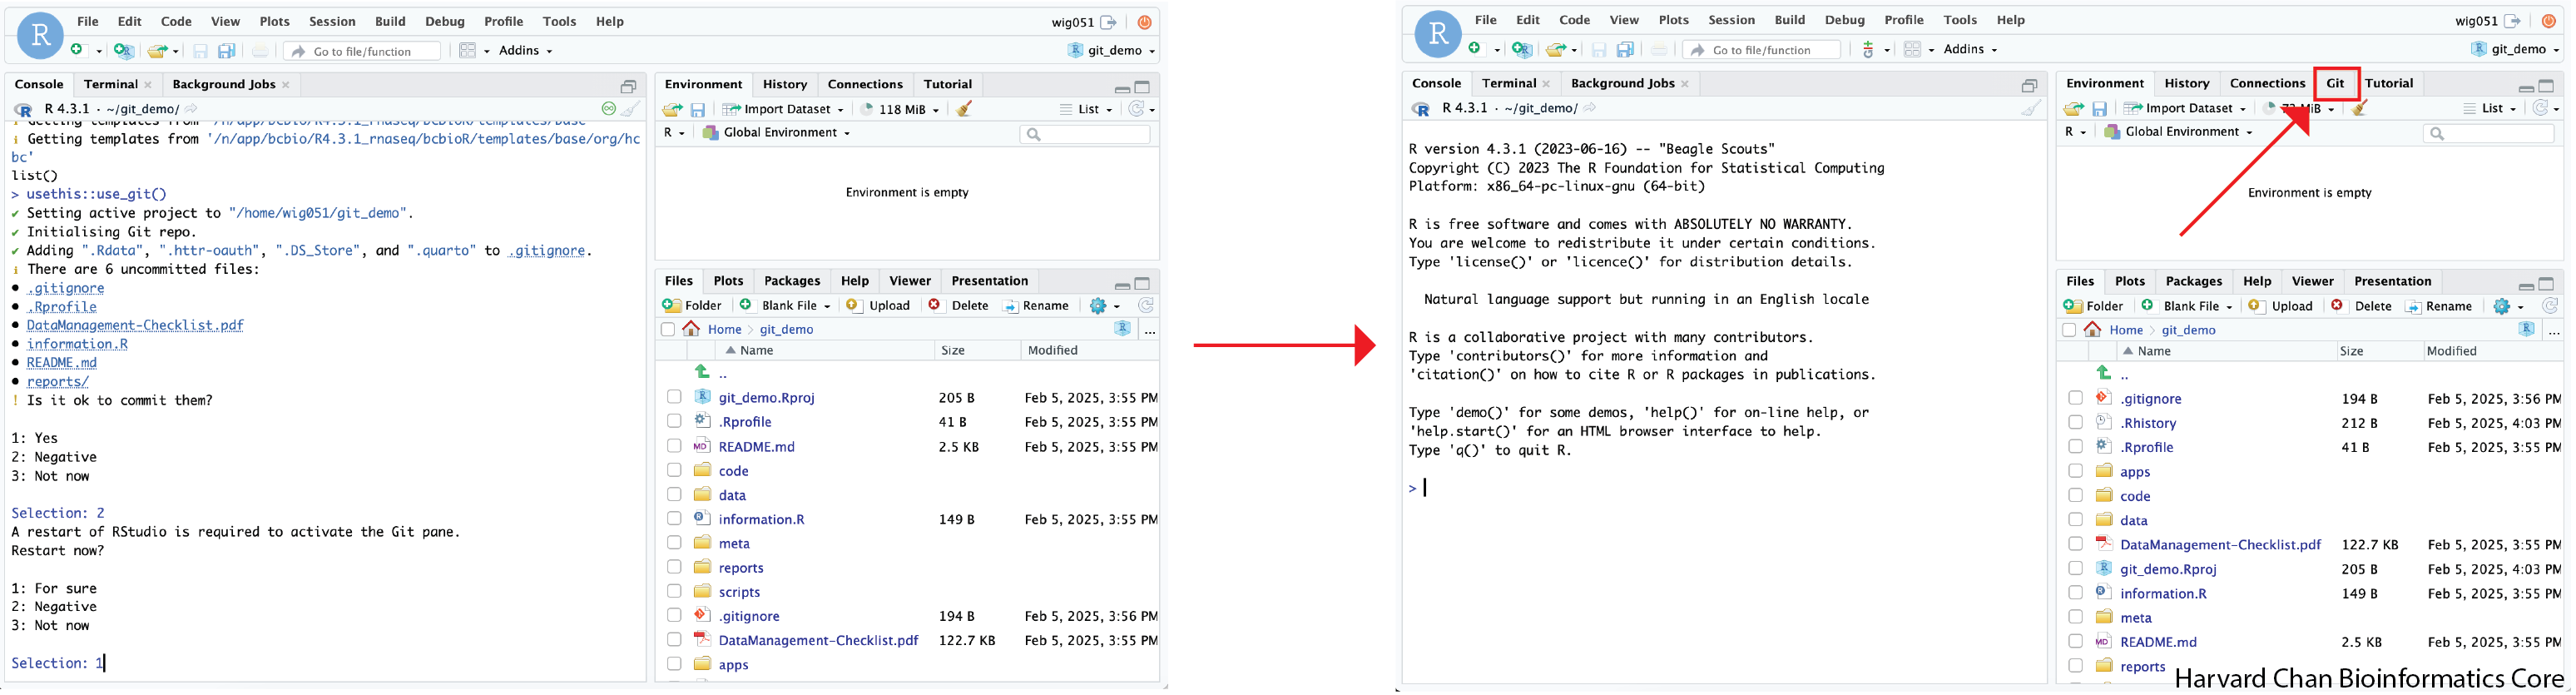
In order to do this we will use the following command:
This command is the command one would usually use in order to make a commit. However, if we choose to not make a commit and then restart R, it will give us our Git tab in the Workspace Browser. This command should return:
✔ Setting active project to "/home/wig051/git_demo".
✔ Initialising Git repo.
✔ Adding ".Rdata", ".httr-oauth", ".DS_Store", and ".quarto" to .gitignore.
ℹ There are 6 uncommitted files:
• .gitignore
• .Rprofile
• DataManagement-Checklist.pdf
• information.R
• README.md
• reports/
! Is it ok to commit them?

1: Yes
2: Negative
3: Not now
We do not want to commit these files yet, so select one of the answers like Negative, No way or No.
Note: It is unclear why Git gives us three choices. The possible choices are re-arranged each time and have different text. So your option may vary a bit from these, select one of the appropriate options for NOT commiting.
Next, you will be prompted as to whether you want to restart R:
A restart of RStudio is required to activate the Git pane.
Restart now?

1: For sure
2: Negative
3: Not now
We will need to restart R in order to get the Git tab in our R Studio, so select For sure, Yeah or some other option for answering in the affirmative.
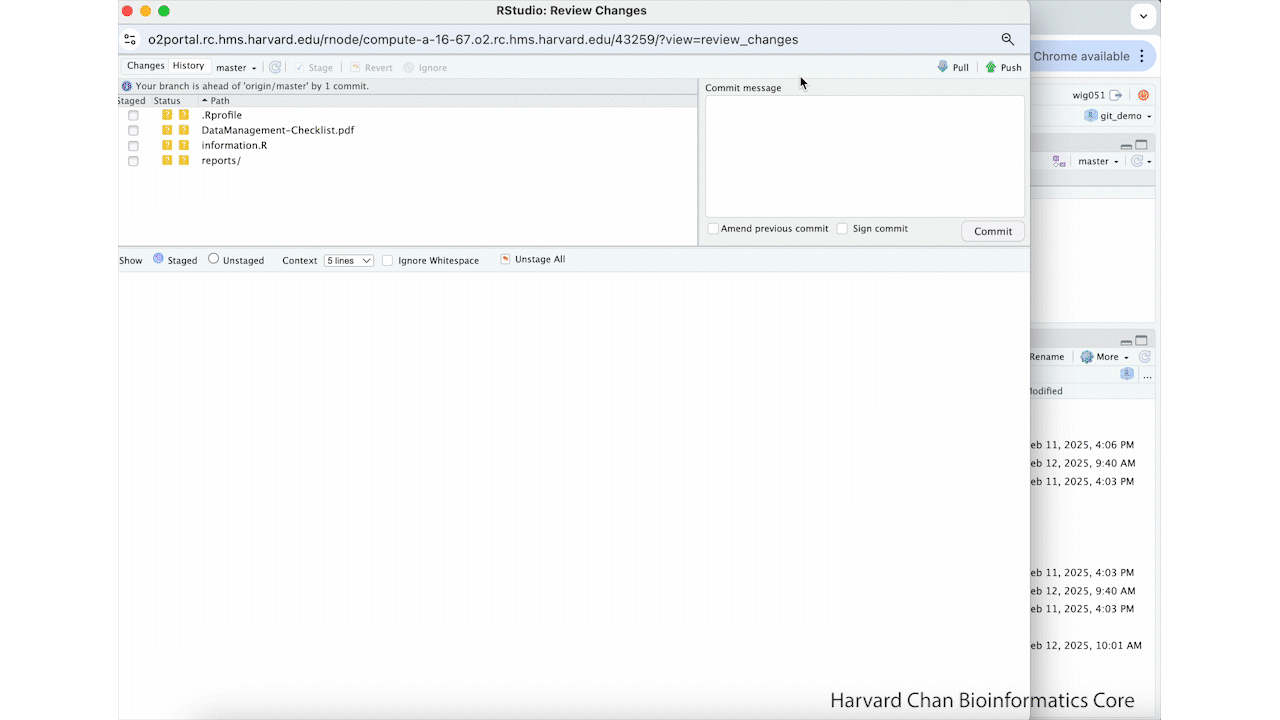
Creating the first commit
Now, we are going to create our first commit. In order to do this, we need to:
- Navigate to the Git tab in our Workspace Browser
- Left-click to check the "Staged" checkboxes next to
README.mdand.gitignoreto select the files that we would like to add to our first commit - Left-click Commit in the Git tab
- Add a message for our commit
- Left-click Commit underneath the textbox where we added the message for our commit
- Close both Git windows
These steps are summarized in the GIF below:
Pushing our initial commit
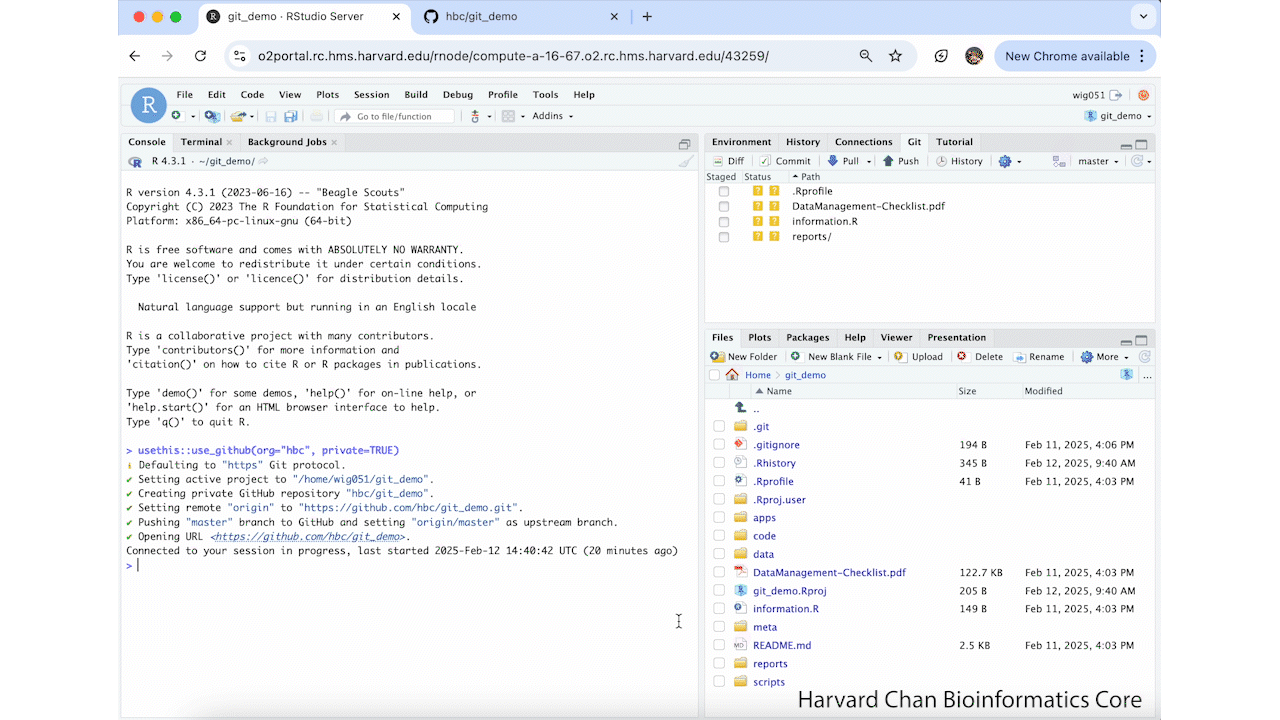
Now we will use the function to push these changes to GitHub with the following command:
If you do not have a valid GitHub token, this will give you an error (see below). If you already have a valid GitHub token, you will get this text in your console and it will push this repository to the HBC GitHub with the following output:
ℹ Defaulting to "https" Git protocol.
✔ Setting active project to "/home/wig051/git_demo".
✔ Creating private GitHub repository "hbc/git_demo".
✔ Setting remote "origin" to "https://github.com/hbc/git_demo.git".
✔ Pushing "master" branch to GitHub and setting "origin/master" as upstream branch.
✔ Opening URL <https://github.com/hbc/git_demo>.
If the push is successful, then it will look like this GIF below:

Note: You might get a GitHub 404 error page (see image below) when you do your first push to GitHub. Just refresh the page in your browser and it should be resolve itself.

Expired or non-existent GitHub token
However, if your token is expired or this is your first time using GitHub from O2, then you will get this message:
ℹ Defaulting to "https" Git protocol.
✔ Setting active project to "/home/wig051/git_demo".
Error in `usethis::use_github()`:
✖ Unable to discover a GitHub personal access token.
ℹ A token is required in order to create and push to a new repo.
☐ Call usethis::gh_token_help() for help configuring a token.
Run `rlang::last_trace()` to see where the error occurred.
If this is the case, then you will need to create a new GitHub token, click on the dropdown box below for instructions on how to create a new GitHub token.
Click here to see how to create a GitHub Token
The first thing we will need to do when setting up our GitHub token is to set-up our credential helper. We can do this by left-clicking on the
Terminal table in the Console Window. You may need to load Git in the Terminal using:module load gitThen you can provide the following line of code to store your GitHub token for future O2 sessions:
git config --global credential.helper storeThis process is summarized in the GIF below:
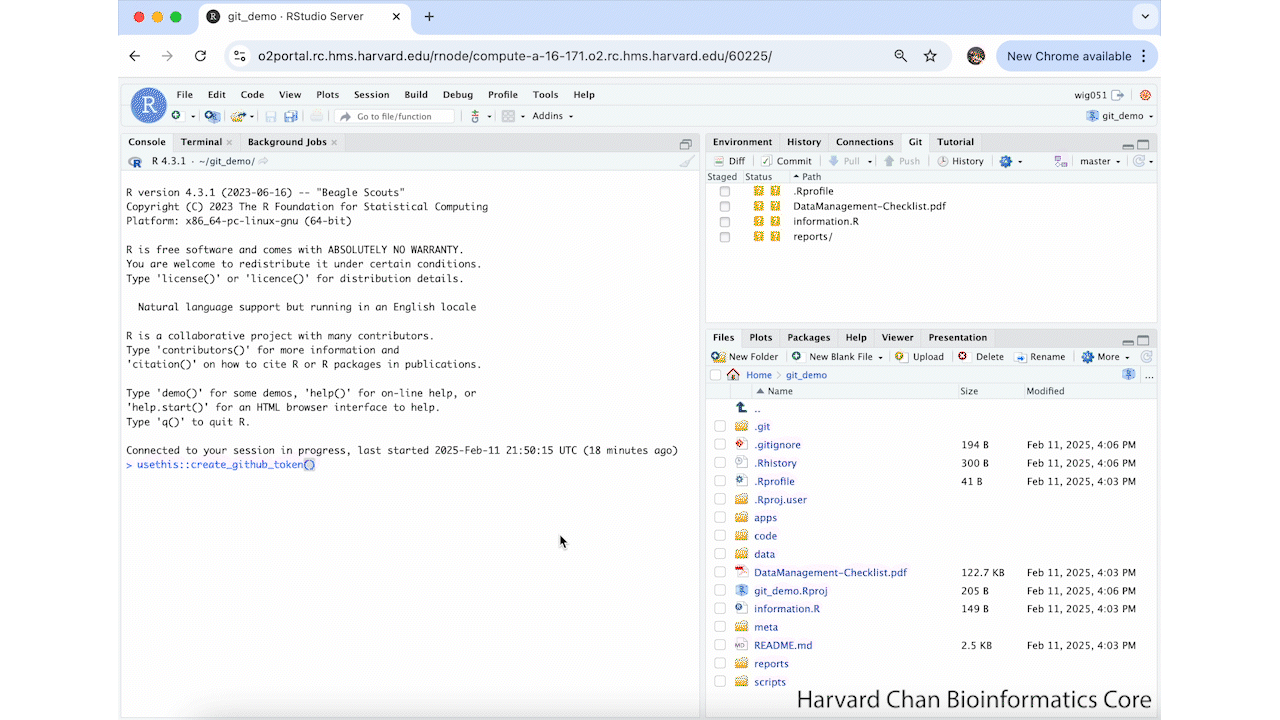
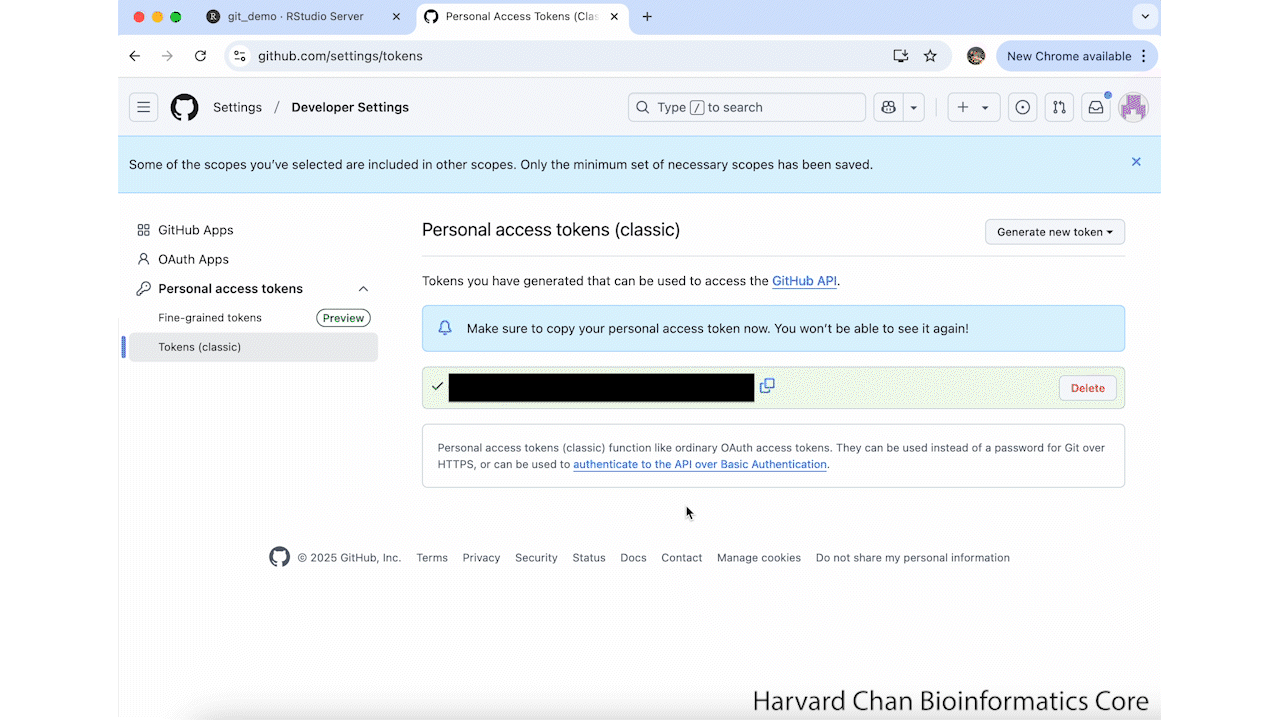
usethis::create_github_token()This will take you to a GitHub Webpage. It may prompt you to sign-in to GitHub. From here, you need to name your token and select an expiration date for your token. Then, scroll to the bottom of the page and left-click Generate token. These step are summarized in the GIF below:
gitcreds::gitcreds_set()Paste in your copied GitHub token and hit Return/Enter. It should return:
-> Adding new credentials...
-> Removing credentials from cache...
-> Done.
These steps are summarized in the GIF below:
.git-credentials in your Home directory and it should look like:https://PersonalAccessToken:YOUR_GITHUB_TOKEN@github.comWhere
YOUR_GITHUB_TOKEN has been replaced with your GitHub Token.Note: In order to see hidden file in your file browser on the O2 Portal, you will need to click on the cog in the top right of theNext, try pushing your repository to the HBC GitHub again with:Filestab and selectShow Hidden Files.
usethis::use_github(org="hbc",private=TRUE)
Making your first edit
We will now make an edit and push that to GitHub.
Editing the README.md
We are going to edit the README.MD using these steps:
- Open the
README.md - Change the header from
Guidelinesto the assigned HBC code for the project (PI_brief_description_hbcXXXX) - Save the changes to
README.md - Select the checkbox in the "Staged" area of the Git tab for the
README.md - Left-click Commit
- Add a commit description
- Left-click commit again
- Left-click Close to close the pop-up window for the commit
These steps are summarized in the GIF below:
Pushing the edit to GitHub
Now that we have made this commit, we will push it to GitHub using these steps:
- After completing your commit, left-click Push
- Left-click Close to close the pop-up window for the push
- Close the additional pop-up window
- Navigate to the GitHub page for this repository
- Refresh the page if necessary
You should now see the HBC code as the header to the README.md on GitHub. These steps are summarized in the GIF below: